
Machine Gun Employment: Fire Control and Surface Danger Zones

This short article is taken from our new Small Unit Machine Gun Employment book. The article discusses fire control and surface danger zones. We welcome your reactions, comments and ideas on our Facebook page and if you like the article, click below to check out the book on Amazon.
Machine Gun Employment: Fire Control and Danger Zones
Our latest book goes into detail on a wide range of topics relating to machine gun theory and various tactics and techniques for using machine guns in combat. This article takes a few sections and diagrams from the section on fire control and surface danger zones. The full book goes into more detail on this topic and offers additional fire control techniques and examples for leaders at all levels.
Cone of Fire
One of the first concepts to understand when learning about machine guns is the cone of fire. If you point a machine gun at a target and hold down the trigger, the bullets will not all go through the same hole. Rather they will spread out across the target. Part of this spread can relate to recoil and shooter stability. However, even if you place the gun on a tripod or in a vice, the gun will still spray bullets in a cone shape (see diagram below). The gun is actually designed to produce a cone of fire. In comparison, a sniper rifle is designed for pinpoint accuracy. If you put a sniper rifle in a vice and pull the trigger repeatedly, it will fire each bullet through the same hole, or at minimum the shots will be in a tight group depending on the range of the target. Therefore, while the sniper rifle is designed to be accurate, it could be said that the machine gun is designed to be inaccurate to a point. Note that the diagrams below are exaggerated for demonstration purposes and do not reflect actual ballistics.

Point Target vs. Area Target
In the previous section we mentioned that it could be said that the machine gun is designed to be inaccurate. Why would this be? To answer this question examine the diagrams below depicting the view through a sniper optic and machine gun optic. Note that the illustration is generalized for demonstration purposes. If the sniper rifle shoots at the three troops standing in the crosshairs, the bullet will strike only the center trooper. If someone designed a machine gun that was as precise as a sniper rifle and you squeezed off a 9-round burst aiming at the center trooper, all 9 bullets would go through that one trooper. It is not logical to shoot the same target 9 times when two other targets stand untouched on either side. With this in mind, observe the example to the right. Because the machine gun is designed to produce a cone of fire, if you squeeze off a 9-round burst at the three troopers in the picture, depending on the range, there is a strong chance that at least one bullet will hit each target. In summary, the machine gun’s cone of fire allows you to engage an area target and potentially hit multiple enemies with a single burst of automatic fire.

Surface Danger Zones - Bullet Dispersion and Ricochet
As the range to target increases, the cone of fire produced by the machine gun gets wider and wider. The area produced by this cone where bullets could potentially impact is called a surface danger zone. The diagram below is taken from the U.S. Army’s Infantry Squad and Platoon field manual and gives a visual representation of how the U.S. Army calculates surface danger zones for direct fire weapons. Explaining the diagram, “distance X” at the top represents the maximum range (not to be confused with the maximum effective range) of the machine gun. The horizontal line represents the gun’s aiming direction. 5-degrees to either side of that is the dispersion area, which represents the area where bullets are likely to disperse based on movement of the gun and the cone of fire. An additional 5-degrees to either side of the dispersion area is the ricochet area. This is the area where bullets might disperse due to ricochets. Therefore, when emplacing a machine gun, it is unsafe for friendly forces to be anywhere inside a 20-degree arc extending out to the gun’s maximum range.

To fully understand how big surface danger zones actually are on the battlefield, it can be helpful to perform some calculations on a map or satellite image of your home town or post. For this example it is difficult to pick a location that all readers will be familiar with but it is likely that many people reading a book on infantry tactics will be familiar with Fort Benning, Georgia. The satellite image below depicts all of the Fort Benning main post and most of Lawson Army Airfield. If you placed a M2 .50-caliber heavy machine gun in the commissary parking lot and fired it towards Fort Benning, your bullets could reach all the way to Lawson Army Airfield and the danger zone where bullets might impact would cover most of the runway. An M240B 7.62mm medium machine gun would fly over the entire golf course and reach the Holiday Inn Express on the edge of main post. The danger zone would span almost the entire width of main post. If you are not familiar with Fort Benning, it can be useful to perform this same exercise in an area you are familiar with. It surprises most people to see just how far and how wide machine gun bullets can reach. Remember, a bullet will not stop until it runs out of energy or impacts something solid. Therefore, any school that is teaching weapon safety will teach you to identify your target and what is beyond your target, to ensure your bullets do not go through or past your target and hit an innocent person. When your bullets have the ability to travel as far as 6,764 meters past your target, this aspect of safety planning is all the more important.

Target Reference Points and Shifting Fire
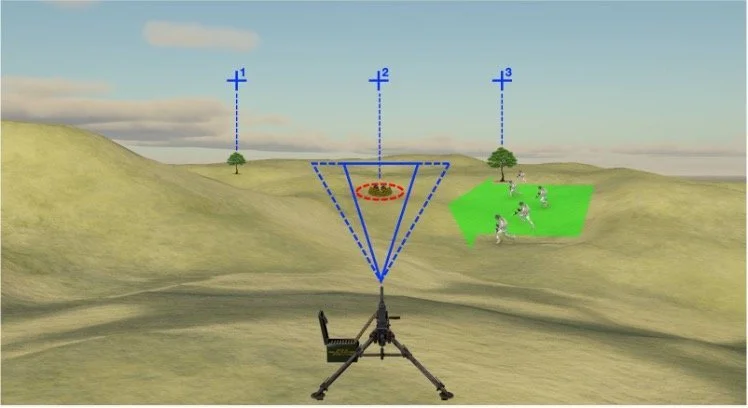
Given the previous discussion of surface danger zones, it is very important to ensure friendly troops do not accidentally maneuver into areas where they might accidentally get hit by your machine gun bullets. This becomes a particular problem when an assault element (green arrow) has to conduct a flanking assault on an objective (red circle) that you are suppressing with a machine gun as in the example below. If you continue to fire on the enemy position while friendly troops assault through you will risk shooting your own people. Therefore, it is important for the leader and machine gun team to established prearranged shift fire signals and control measures on the ground. In this example, the squad/platoon leader identified three Target Reference Points (TRPs) marked with blue crosses on the example below. The machine gun starts by firing between TRP1 and TRP2, focusing on TRP2 which is the enemy position. If the gun fires further to the right, bullet dispersion or ricochets might hit friendly troops. As the friendly troops flank, prior to reaching the lone tree on the right (TRP3) they will give the shift fire signal to the gun and confirm that fire has shifted before continuing forward. It is important in this case that both the gunner team and the assault element can identify TRP3 on the ground. It is also important to have effective and redundant communications methods for communicating the shift fire signal/command. Finally, note that this example uses obvious reference points in open terrain. In real combat on real terrain, identifying reference points for fire and maneuver might be much more difficult.
After receiving the shift fire signal, you will shift fire to the left of TRP1. Note that means that your right-most point of aim will be TRP1. As shown in the image below, that does not mean bullet dispersion and ricochets will not spread to the right of TRP1. As the assault element crosses the objective the enemy will most likely pull back (dotted red line). After shifting fire, your new field of fire will continue to engage the enemy forces as they move to your left. However, the assault element must stop at some point or they will run into your field of fire as well. Therefore, in addition to the other control measures the assault element must have a Limit of Advance (LOA) which is marked with a green dashed line in the example below. The LOA does not necessarily need to be tied to a terrain feature on the ground and in many cases it is just one bound (or 3-5 second buddy rush) past the end of the objective. However, note that the objective might be larger than what you could see from the initial gun position before flanking and if you are not careful the assault element might accidentally push too far forward if it becomes disoriented. This is particularly challenging in dense terrain, at night or in low visibility conditions. The important thing is that both the gun and assault team are on the same page to ensure the assault team stops before assaulting into the path of the gun.

When shifting fire, there is always the possibility that you will accidentally shoot your own troops if you continue to fire as they assault the objective. For this reason, a safer option is sometimes to cease fire all together. The disadvantage of this is that it takes pressure off the enemy who might turn around and resume fighting when they hear the machine guns stop firing. However, there are ways to mitigate this risk by employing an additional gun in a local support position. We will discuss those options later on. Another option is to “lift” fire. Many people mistakenly think lift fire means to stop firing, just like cease fire. However, according to doctrine, lifting fire means actually lifting the trajectory of the bullets so the beaten zone remains the same, allowing troops to maneuver under the arc of the machine gun’s bullets. This can be difficult to achieve in real-world combat conditions and as already discussed, employing higher-angle machine gun fires can be difficult or impractical in many cases. Finally, firing over the heads of friendly troops is always dangerous so for these reasons we generally discourage trying to use the lift fire technique. However, in certain situations and certain types of terrain the lift fire technique might be appropriate as long as it is used with extreme caution.

We hope you found the short article useful and once again we welcome your reactions, comments or suggestions on our Facebook page where we frequently hold constructive discussions on tactics with people from various tactical backgrounds and experience levels. Also, click below if you would like to check out the full book on Amazon.